본문 바로가기

CNC

Desktop CNC 1419 Enclosure #2 (Panels) Desktop CNC 1419 Enclosure #2 (Panels) ※ 다른 패널은 두께가 5mm이나, 도어 안쪽 패널은 두께가 10mm로 설계했기 때문에 추가로 볼트 장착용 작업 필요 더보기
Desktop CNC 1419 (Spindle 소음 비교) Desktop CNC 1419 Spindle 소음 비교 775 Bundle Spindle vs 500W BLDC Spindle 775 Bundle Spindle 500W BLDC Spindle 소음 더보기
CNCjs Setup #2 (CNCjs Install) CNCjs Setup #2 (CNCjs Install) 1. git 설치 sudo apt-get update sudo apt-get upgrade -y sudo apt-get dist-upgrade -y sudo apt-get install -y build-essential git #필요한 경우 설치 sudo apt-get install htop iotop nmon lsof screen -y 2. Node.js 설치 (자바스크립트 런타임) # Node.js 설치 curl -sL https://deb.nodesource.com/setup_8.x | sudo -E bash - # Install NodeJS v8 sudo apt-get install -y nodejs # NPM 업데이트 sudo npm ins.. 더보기
Desktop CNC 1419 Enclosure #1 (Frame) Desktop CNC 1419 Enclosure #1 (Frame) 
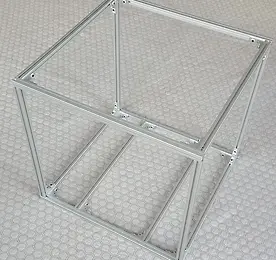
※ 알루미늄 프레임 (420mm 6개, 390mm 6개, 375mm 6개 1-1. 도어 프레임 준비 1-2. 선입 너트를 먼저 넣고 1-3. M3 10mm 볼트에 스페이서를 삽입후 1-4. 직각 브라켓을 프로파일에 고정한다. (도어 프레임 완료) 2-1 하부 프레임 준비 2-2 하부 프레임을 고정할 직각 브라켓, M3 볼트, 스페이서, 너트 준비 2-3. 선입 너트를 프로파일에 삽입하고, 볼트에 스페이서를 삽입 2-4. 직각 브라켓을 프로파일에 가조립한다. 2-5. 하부 프레임 조립 완료 3-1. 상부 프레임용 프로파일 준비 3-2. 직각 브라켓, M3 볼트, 스페이서, 선입 너트를 준비한다. 3-3. 선입 너트를 프로파일에 삽입하고, .. 더보기
CNCjs Setup #1 (Raspberry PI SSH/WIFI Setup without keyboard) CNCjs Setup #1 (Raspberry PI Setup without keyboard) 1. 라즈베리 파이 이미지를 다운로드 받는다. (Link) 2. 다운 받은 이미지를 Etcher를 사용하여 SD Card에 굽는다. (Link) 4. SSH를 사용하기 위해 루트 디렉토리에 "ssh" 라는 파일을 만든다. 1) 새로 만들기에서 텍스트 문서 선택 2) "ssh"로 이름 변경 4. WIFI 셋업을 위해 "wpa_supplicant.conf" 파일을 만든다. 1) 새로 만들기에서 텍스트 문서 선택 2) 새로 만들어진 파일 편집 3) WIFI 셋업을 위한 내용 입력 : KR : 와이파이 이름 (대소문자 구분) : 패스워드 ctrl_interface=DIR=/var/run/wpa_supplicant GR.. 더보기
Desktop CNC 1419 Assembly #3 (Gantry) Desktop CNC 1419 Assembly #3 (Gantry) 1. Prepare gantry plates, motor, m3 9mm screws 2. Assemble motor with m3 screws 3. Prepare m5 16mm (edge), m5 20mm (center) screws 4. Assemble gantry plate with m5 screws 5. Prepare spindle unit 6. Remove polished rod from spindle unit and prepare m5 16mm screws 7. Insert polished rod to gantry plate and tighten with m5 screws 8. Prepare al profile, m5 16mm .. 더보기
Desktop CNC 1419 Assembly #2 (Bed) Desktop CNC 1419 Assembly #2 (Bed) 1. Prepare front/rear bed plate, feet and m4 14mm screws 2. Assemble feet with m4 screws 3. All done 4. Prepare motor and m3 9mm screws 5. Assemble motor with m3 screws 6. Prepare y axis plates, flange bearings and m4 8mm screws 7. Assemble flange bearing with m4 screws 8. Prepare copper nut and m3 12mm screws 9. Assemble copper nut with m3 screws 10. Prepare b.. 더보기
Desktop CNC 1419 Assembly #1 (Spindle Mount) Desktop CNC 1419 Assembly #1 (Spindle Mount) 1. Prepare motors and couplings 2. Assemble the motor with couping and tighten socket set screws 3. Prepare m4 8mm screws and flange bearing 4. Fix flange bearing to the side hole ※ Oops! there is no tab!! 5. After fix flange bearings 6. Prepare motor and hand wheel 7. Fix hand wheel to motor 8. Unscrew copper nut 9. Prepare motor mount and m3 9mm scr.. 더보기